Marc’s Mountain Maintenance shows you how to fix: The Hole Behind the Door
We've all seen them. We’ve all had them. So how do you fix The Hole Behind the Door?Before you set out to fix anything, get a proper door stop, and position it on the baseboard molding behind the door, ensuring that the stop will hit within the bottom inch of the door (where the door is reinforced). Be sure to leave at least one inch clearance space between the wall and the door knob when the door is fully opened.
Step 1:
Square the hole by using a small ruler or square and drawing a box around the hole. Cut out carefully with a utility knife.
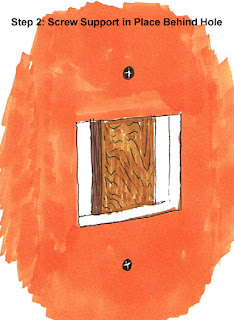
Step 2:
Insert a piece of scrap wood or molding at least 1/2 inch thick into the hole being sure not to let the piece drop down inside the wall. This will provide support for the next step.Using 1-1/4 to 1-5/8 sheetrock screws, attach the wallboard to the scrap wood at least 2 inches from the edge of your squared hole. Use one screw on each side and tighten until the screw head is just slightly below the surface of the wallboard.
Steps 3, 4 & 5:
Cut a piece of sheetrock to fit inside the squared hole and screw into place with sheetrock screws.
Cut adhesive-backed Fibertape to fit, and place adhesive side down covering the seams around the hole.
Step 6:
Using joint compound, and a 6” joint knife, apply a smooth coat of compound over the hole, covering all seams, the hole itself and all screw holes. Let dry and apply two additional coats spreading out your working area with each additional coat to achieve a smooth, feathered patch.
Step 7:
Sand and paint.
Email Marc Jones of Marc’s Mountain Maintenance at marcgjones@aol.com with any question or phone Marc at 720-261-7569.
I would like to thank Marc for the DIY instructions. Marc is a true craftsman and artisan. He did all the illustrations for this post. (you should see what he can do with tile).


No comments:
Post a Comment